- Download the ITmanager.net Enterprise Server Installer here: www.itmanager.net/download/
- Install the Enterprise Server on a Windows server inside your private network, ideally a server which is always on and permanently connected to your network. Although, for testing purposes you may install the PNC on a desktop or laptop computer. It is only required to install a single Enterprise Server to manage an entire network of servers. You can install the Enterprise Server on multiple servers if you want to manage multiple disconnected networks
- Login to using the credentials you registered to setup your ITmanager.net account
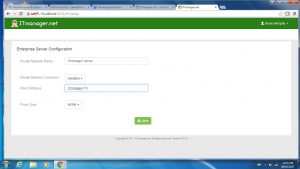
- Enter your Network Name (name you want to give the Enterprise Server). To use your company/own VPN in the field “Private Network Connector” from the dropdown choose “Disable”. If you are using a Proxy here are instructions for Proxy setting
5. The mobile device will be attempting to probe the port 135 (WMI), 3389 (RDP) and 389(LDAP) using the Enterprise Server called “Itmanager PC”. A number of things need to be in place. The ITmanager.net mobile device app must be able to connect to “ITmanager PC” directly or using your company/own VPN client since the Enterprise Server is disabled. To test this open the mobile device web browser and try to connect to https://ITmanager PC:4153 .
The Enterprise Server “ITmanager PC” needs to be able to connect to “tor-dc-01” on port 135, 3389 or 389. Test this by typing in a command prompt on the server ITmanager PC the following command “telnet tor-dc-01 135”. The Enterprise Server logs will also show the attempt to probe the 135 port if the first test succeeds.
6. In the ITmanager.net Mobile or Web App, configure your Server connections to point to the newly installed Private Network
Still have questions?
Send us an email: support@itmanager.net